Exciting New Venture

Hi there crafty peeps!  I am popping in today to share a card I have made and to announce a very exciting new chapter in my creative journey.  I have felt a pulling at my heart for a very long time to teach others about this wonderful hobby of papercrafting and the newest techniques out there.  I have also been asked from several friends to teach them about the different coloring medias available for stamping and how to use them.  I am at a good point in my life now to be able to do this, so I decided to jump in head first so to speak.  I have decided to join the Fun Stampers Journey team as a journey coach!  I met Richard Garay and a few of the wonderful team of Journey Coaches at my local Scrapbook Expo last month.  I immediately felt the fun positive energy of this team and knew this was the right path for me.

I had a chance to play around with a few of the amazing products that came in my starter kit and came up with this lovely little thank you card!


I started out by stamping 3 Cacti from the Stuck on You stamp set onto Canson watercolor paper with Black Licorice ink.  All of the inks are fusion hybrid inks, so they provide the clean crisp color of a pigment ink with the permanency and quick drying of a dye ink.   I then watercolored them with my Zig Clean Color Real Brush markers.  After they had dried, I cut them out with the coordinating dies.  
I then matted two pieces from the Journey Basics Pastels paper pack onto an A2 Oatmeal Cookie cardstock base.  I then cut out another piece of watercolor paper with a pierced rectangle Die.  I stamped a light background on this piece with the Ink Splat stamp in Banana Cream ink.  I then stamped the "thank you" sentiment from the same Stuck on You stamp set with Black Licorice ink.  I adhered this onto the card and wrapped Natural Twine around the bottom.  I then adhered my three Cacti onto the right side of the card popping up the front one with foam squares.  I added some sparkle with my clear Wink of Stella marker and some shine to the pots with Journey Glaze.  It is a mix between a glaze and a resin so it creates a very shiny smooth glass-like surface without bubbles.  Finally I added some sequins from my overly large stash just because I felt it needed a "little something" to tie the whole card together.

I really hope you have enjoyed my card and it interested you in checking out this great new company. I would love it if you would check out my website www.funstampersjourney.com/AmberMilone.  If you have any questions about the company or products don't hesitate to contact me.  Have a wonderful day!

Layered Pansies

Hello there craft enthusiasts!  I am back today on the Really Reasonable Ribbon blog to share a pretty feminine card I created with lace and twine from the Really Reasonable Ribbon store.


The layered Pansy Image came from a die cut sheet made by a German company called Reddy Creative Cards.  I found them at a local stamping store.  I layered it on top of a fancy oval frame that I cut with my Silhouette machine.  I added some Stickles in Crystal randomly to the flowers as an accent.  I then added a wood veneer butterfly inked with Tim Holtz Distress Ink in Shaded Lilac and Scattered Straw.  I adhered two flat backed pearls to the center to give it a more feminine touch.  I created a band and bow with 5/8" Ivory Crochet Lace and Lemon Bakers Twine.  I added a purple button then to the center of the bow.  

I hope you enjoyed my card today, and it inspires you to create something beautiful as well.  Have a wonderful day!
Autumn Colors with Ribbons Challenge

Hi there Crafty Peeps!  It is time for another challenge over at the Really Reasonable Ribbon Blog.  Bonnie is challenging all of us to grab our ribbons and create something with an Autumn colors theme to it.


I wanted to create a card with an abundance of beautiful fall colors incorporated into it.  I cut down a piece of Canson Watercolor paper to 4 x 5.25 inches.  I wet the entire paper then colored it up with my Gansai Tambi watercolor set.  I just love how creamy and blendable these watercolors are.  After that dried I matted it onto a piece of Chocolate cardstock cut to 4.25 x 5.5 inches.  I took a few of the leaves from the LJD Fall Foliage stamp set by MFT and stamped them in Ranger Java Bean ink onto my watercolored panel.  I then stamped the sentiment from the same set with Versafine Onyx Black Ink.  I took some 40lb velum and die cut the leaves from Lawn Fawn Stitched Leaves Lawn Cuts die.  I colored them in fall colors with my Copic Markers.  I then glued them onto my panel.

I created my band and bow from Gingham Ribbon in Wine and Ivory Jute String available in the Really Reasonable Ribbon Store.  The bow was created with the help of my awesome Bow-It-All tool.  I then added some Doodlebug sparkly enamel dots as an accent to both corners of my card.  Finally I adhered the entire panel to a top folding A2 size white card base.  I hope you enjoy my card, and it puts you in the mood for crisp fall days and warm apple cider.  Yum!  Head on over to the blog and link up your projects.  Have a wonderful crafty day!

Shabby Chic with Ribbons

Hi there crafty peeps!  I am back today to share a lovely little vintage Shabby Chic inspired card.  All of the papers including the image is from Polly's Paper and her beautiful Victorian Trading Card Creativity Kit.  These kits make card making so easy! 


I distressed the papers with a distressing tool and inked the edges with Frayed Burlap distress ink.  I layered them all over a band of Beige Canvas Color Band Ribbon and Arianna Natural Crochet Lace in Ivory.  I then created a small bouquet to the top corner with a variety of Mulberry flowers.  I then finished the flower cluster with a double loop bow in the same Beige Canvas Color Band Ribbon made with my Bow-It-All tool.  I then adhered the card to a white A2 top folding card base.  I finished it off with some chocolate flat backed pearls from my stash and some Crystal Stickles on the image.

All of the supplies highlighted above can be found at the Really Reasonable Ribbon store, so go check it out.  I hope you enjoy this lovely Shabby card.  Have a wonderful day!

Really Reasonable Ribbon August Blog Hop


Hi there crafty ribbon lovers!  Today is the day for the August Blog Hop at Really Reasonable Ribbon. The design team and I have cooked up some beautiful projects with the new Autumn Days ribbon assortment.


If you are following along you should have come here from Ginny's Blog.  If not, head over to the Really Reasonable Ribbon Blog to start at the beginning.

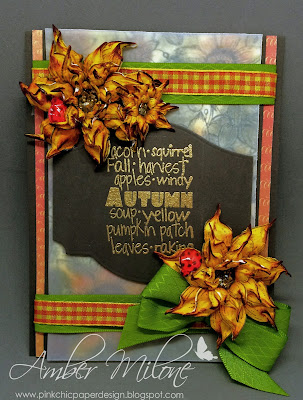
I knew right away when seeing the ribbon club assortment for this month that I needed to use the Classic Sunflower stamp and die set from Heartfelt Creations.  I stamped the sunflowers and then colored them with my Tombo markers.  I layered several blossoms together and formed the petals with my flower shaping kit.  I pinched the edges with my fingers and then ran some Distress ink in Aged Mahogany on the tips as well.  I made the centers sparkle with some Gold Gala Glitz.  Of course I had to add two lady bugs covered in Glossy accents because they are too cute to pass up.  I stamped the background stamp and inked it up with Distress Inks.  I then covered it with 40lb Velum to create some softness. The sentiment is an older stamp from C.C. Designs that I had in my collection.  I stamped it onto Chocolate cardstock and heat embossed it with gold embossing powder. I die cut a tag out of the sentiment from an older MFT Stax die.


I created two bands around the card with Kiwi Green Diamond Satin and 3/8" Orange/Yellow plaid ribbon.  I then created a double loop bow with the same Kiwi green ribbon and tucked it under the lower right sunflower.

I hope you enjoy this fall themed card I created with the beautiful new ribbons from the August Ribbon Assortment.  Now head on over to Bonnie's Blog which is the next on our hop.  Have a wonderful crafty day!

Let Your Dreams Set Sail

Hi there crafty peeps!  I am back today with a shaker card that I made using some new products from Simon Says Stamp and Twine from the Really Reasonable Ribbon store.


I stamped the anchors to create a background for my shaker element and then built the shaker on top using acetate and oval Stax Die Namics from MFT.  I used a variety of sequins from my stash to fill the shaker.  I stamped the clouds, boat, and waves on white 110lb cardstock and then watercolored them lightly so the cardstock would not pill.  I fussy cut it all out and created a scene around the shaker oval.  I die cut the 'Congratulations' sentiment from SSS out of red cardstock and made it more dimensional with glossy accents.  I also stamped another sentiment from the same stamp set underneath the die-cut word.  I added a little patterned paper from my July SSS card kit for on accent around two sides of the card.  The twine I tied to the top is Ivory Burlap String.

I hope you enjoy this card!  I really love how fun and nautical it turned out.  Have a wonderful day.